執行副作用
到目前為止,我們只看到瞭如何獲取資料(也就是執行 GET HTTP 請求)。
但是副作用(例如 POST 請求)呢?
應用程式通常實現 CRUD(建立、讀取、更新、刪除)API。
執行此操作時,更新請求(通常是 POST)通常還應更新本地快取,以使 UI 反映新狀態。
問題是,我們如何從消費者程式內部更新提供者程式的狀態?
理所當然的,提供者程式不會公開修改其狀態的方法。
這是設計使然,以確保僅以受控方式修改狀態並促進關注點分離。
相反,提供者程式必須顯式公開修改其狀態的方法。
為此,我們將使用一個新概念:通知者程式(Notifiers)。
為了展示這個新概念,讓我們使用一個更高階的例子:待辦事項列表。
定義通知者程式
讓我們從此時我們已經知道的內容開始:一個簡單的 GET 請求。 正如之前在開始你的第一次 provider/network 請求中看到的那樣, 我們可以透過編寫以下內容來獲取待辦事項列表:
class Todo with _$Todo {
factory Todo({
required String description,
(false) bool completed,
}) = _Todo;
}
Future<List<Todo>> todoList(Ref ref) async {
// 模擬一個網路請求。這通常來自真實的 API
return [
Todo(description: 'Learn Flutter', completed: true),
Todo(description: 'Learn Riverpod'),
];
}
現在我們已經獲取了待辦事項列表,讓我們看看如何新增新的待辦事項。
為此,我們需要修改我們的提供者程式,以便它們公開一個公共 API 來修改其狀態。
這是透過將我們的提供者程式轉換為我們所說的“通知者程式”來完成的。
通知者程式是提供者程式的“有狀態小部件”。它們需要對定義提供者程式的語法稍作調整。
此新語法如下:
@riverpod
class MyNotifier extends _$MyNotifier {
  @override
  Result build() {
    <你的業務邏輯在這裡>
  }

  <你的方法在這裡>
}
| 註解 | 所有提供者程式都必須使用 例如,我們可以透過編寫 |
| 通知者程式 | 當 通知者程式負責公開修改提供者程式狀態的方法。 備註 除了內建的 |
| build 方法 | 所有通知者程式都必須重寫該 不應直接呼叫此方法。 |
作為參考,您可能需要檢視開始你的第一次 provider/network 請求,將這裡的新語法與之前看到的語法進行比較。
除了 build 以外,沒有其他方法的通知者程式與使用前面看到的語法相同。
現在我們已經瞭解了語法,讓我們看看如何將之前定義的提供者程式轉換為通知者程式:
class TodoList extends _$TodoList {
Future<List<Todo>> build() async {
// 我們之前在 FutureProvider 中的業務邏輯現在位於 build 方法中。
return [
Todo(description: 'Learn Flutter', completed: true),
Todo(description: 'Learn Riverpod'),
];
}
}
請注意,在小部件中讀取提供者程式的方式保持不變。
您仍然可以像以前的語法一樣使用 ref.watch(todoListProvider)。
不要將邏輯放在通知者程式的建構函式中。
通知者程式不應具有建構函式,因為 ref 此時其他屬性尚不可用。
相反,將您的邏輯放在方法中 build。
class MyNotifier extends ... {
MyNotifier() {
// ❌ 別這樣做
// 這將會丟擲一個異常
state = AsyncValue.data(42);
}
Result build() {
// ✅ 應該這樣做
state = AsyncValue.data(42);
}
}
公開用於執行 POST 請求的方法
現在我們有了通知者程式,我們可以開始新增方法來執行副作用。
其中一個副作用是讓客戶端 POST 一個新的待辦事項。
我們可以透過在通知者程式上新增一個 addTodo 方法來做到這一點:
class TodoList extends _$TodoList {
Future<List<Todo>> build() async => [/* ... */];
Future<void> addTodo(Todo todo) async {
await http.post(
Uri.https('your_api.com', '/todos'),
// 我們序列化 Todo 物件並將其 POST 到伺服器。
headers: {'Content-Type': 'application/json'},
body: jsonEncode(todo.toJson()),
);
}
}
然後,我們可以在 UI 中使用我們在開始你的第一次 provider/network 請求中看到的相同 Consumer/ConsumerWidget 呼叫此方法:
class Example extends ConsumerWidget {
const Example({super.key});
Widget build(BuildContext context, WidgetRef ref) {
return ElevatedButton(
onPressed: () {
// Using "ref.read" combined with "myProvider.notifier", we can
// obtain the class instance of our notifier. This enables us
// to call the "addTodo" method.
ref
.read(todoListProvider.notifier)
.addTodo(Todo(description: 'This is a new todo'));
},
child: const Text('Add todo'),
);
}
}
請注意我們如何使用 ref.read 而不是呼叫 ref.watch 的方法。
雖然在技術上可以工作,但 ref.watch 建議在事件處理(如“onPressed”)中執行邏輯時使用 ref.read。
我們現在有一個按鈕,按下時會發出 POST 請求。
但是,目前,我們的 UI 不會更新以返回新的待辦事項列表。
我們希望本地快取與伺服器的狀態相匹配。
有幾種方法可以做到這一點,下面說說優點和缺點。
更新本地快取以匹配 API 響應
一種常見的後端做法是讓 POST 請求返回資源的新狀態。
特別是,我們的 API 將在新增新的待辦事項後返回新的待辦事項列表。
一種方法是編寫 state = AsyncData(response):
  Future<void> addTodo(Todo todo) async {
    // The POST request will return a List<Todo> matching the new application state
    final response = await http.post(
      Uri.https('your_api.com', '/todos'),
      headers: {'Content-Type': 'application/json'},
      body: jsonEncode(todo.toJson()),
    );

    // We decode the API response and convert it to a List<Todo>
    List<Todo> newTodos = (jsonDecode(response.body) as List)
        .cast<Map<String, Object?>>()
        .map(Todo.fromJson)
        .toList();

    // We update the local cache to match the new state.
    // This will notify all listeners.
    state = AsyncData(newTodos);
  }
- UI 將盡可能具有最新狀態。如果其他使用者添加了待辦事項,我們也會看到它。
- 伺服器是事實的來源。使用這種方法,客戶端不需要知道需要在列表的哪個位置插入新的待辦事項。
- 只需要一個網路請求。
- 僅當伺服器以特定方式實現時,此方法才有效。如果伺服器不返回新狀態,則此方法將不起作用。
- 如果關聯的 GET 請求更復雜,例如如果它具有過濾/排序的功能,則可能仍然不可行。
使用 ref.invalidateSelf() 重新整理提供者程式。
一種選擇是讓我們的提供者程式重新執行 GET 請求。
這可以透過在 POST 請求之後呼叫 ref.invalidateSelf() 來完成:
  Future<void> addTodo(Todo todo) async {
    // We don't care about the API response
    await http.post(
      Uri.https('your_api.com', '/todos'),
      headers: {'Content-Type': 'application/json'},
      body: jsonEncode(todo.toJson()),
    );

    // Once the post request is done, we can mark the local cache as dirty.
    // This will cause "build" on our notifier to asynchronously be called again,
    // and will notify listeners when doing so.
    ref.invalidateSelf();

    // (Optional) We can then wait for the new state to be computed.
    // This ensures "addTodo" does not complete until the new state is available.
    await future;
  }
- UI 將盡可能具有最新狀態。如果其他使用者添加了待辦事項,我們也會看到它。
- 伺服器是事實的來源。使用這種方法,客戶端不需要知道需要在列表的哪個位置插入新的待辦事項。
- 無論伺服器實現如何,此方法都應該有效。如果您的 GET 請求更復雜,例如它具有過濾器/排序,則它可能特別有用。
- 此方法將執行額外的 GET 請求,這可能效率低下。
手動更新本地快取
另一種選擇是手動更新本地快取。
這將涉及嘗試模仿後端的行為。例如,我們需要知道後端是在開頭還是結尾插入新專案。
  Future<void> addTodo(Todo todo) async {
    // We don't care about the API response
    await http.post(
      Uri.https('your_api.com', '/todos'),
      headers: {'Content-Type': 'application/json'},
      body: jsonEncode(todo.toJson()),
    );

    // We can then manually update the local cache. For this, we'll need to
    // obtain the previous state.
    // Caution: The previous state may still be loading or in error state.
    // A graceful way of handling this would be to read `this.future` instead
    // of `this.state`, which would enable awaiting the loading state, and
    // throw an error if the state is in error state.
    final previousState = await future;

    // We can then update the state, by creating a new state object.
    // This will notify all listeners.
    state = AsyncData([...previousState, todo]);
  }
此示例使用不可變狀態。這不是必需的,但建議這樣做。
有關更多詳細資訊,請參閱Why Immutability。
如果要改用可變狀態,也可以執行以下操作:
    final previousState = await future;
    // Mutable the previous list of todos.
    previousState.add(todo);
    // Manually notify listeners.
    ref.notifyListeners();
- 無論伺服器實現如何,此方法都應該有效。
- 只需要一個網路請求。
- 本地快取可能與伺服器的狀態不匹配。如果其他使用者添加了待辦事項,我們將看不到它。
- 這種方法的實現和有效地複製後端的邏輯可能更復雜。
更進一步:顯示下拉載入器和錯誤處理
到目前為止我們所看到的一切,我們有一個按鈕,當按下時會發出 POST 請求;
請求完成後,UI 會更新以反映更改。
但目前,沒有跡象表明請求正在執行,如果失敗,也沒有任何資訊。
一種方法是將返回 addTodo 的非同步結果儲存在本地小部件狀態中,
然後監聽該非同步狀態以顯示下拉載入器或錯誤訊息。
這時flutter_hooks派上用場的一種情況。
但是,當然,您也可以使用 StatefulWidget 代替。
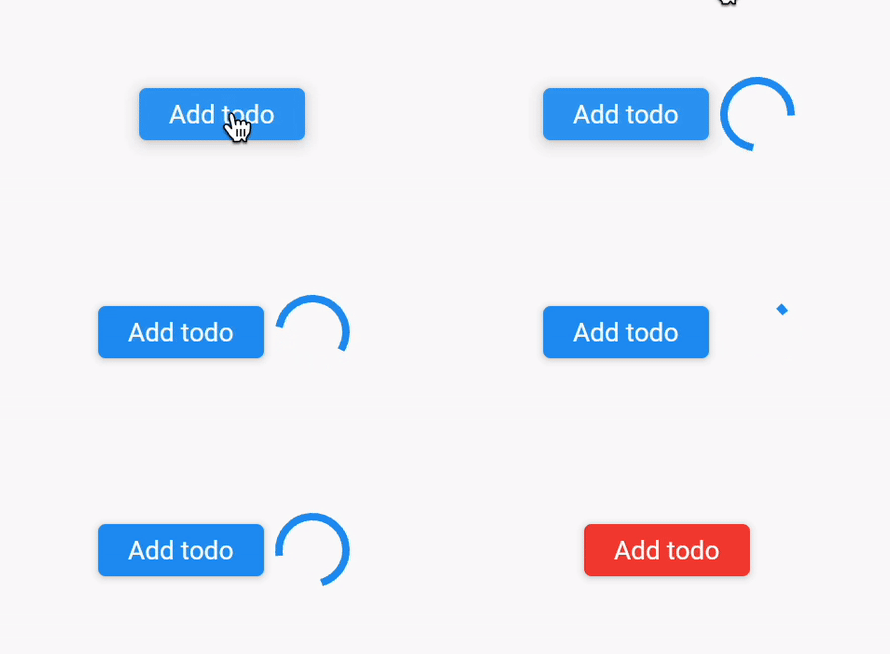
以下程式碼片段顯示了當處於載入狀態時,進度指示器和操作處於掛起狀態。 如果失敗,則將按鈕呈現為紅色:

class Example extends ConsumerStatefulWidget {
const Example({super.key});
ConsumerState<ConsumerStatefulWidget> createState() => _ExampleState();
}
class _ExampleState extends ConsumerState<Example> {
// 待處理的 addTodo 操作。如果沒有待處理的,則為 null。
Future<void>? _pendingAddTodo;
Widget build(BuildContext context) {
return FutureBuilder(
// 我們監聽待處理的操作,以相應地更新 UI。
future: _pendingAddTodo,
builder: (context, snapshot) {
// 計算是否存在錯誤狀態。
// 檢查 connectionState 用於在重試操作時進行處理。
final isErrored = snapshot.hasError &&
snapshot.connectionState != ConnectionState.waiting;
return Row(
children: [
ElevatedButton(
style: ButtonStyle(
// 如果出現錯誤,我們會將該按鈕顯示為紅色
backgroundColor: WidgetStatePropertyAll(
isErrored ? Colors.red : null,
),
),
onPressed: () {
// 我們將 addTodo 返回的 future 儲存在變數中
final future = ref
.read(todoListProvider.notifier)
.addTodo(Todo(description: 'This is a new todo'));
// 我們將這個 future 儲存在本地的狀態中
setState(() {
_pendingAddTodo = future;
});
},
child: const Text('Add todo'),
),
// 操作正在等待,讓我們顯示一個進度指示器
if (snapshot.connectionState == ConnectionState.waiting) ...[
const SizedBox(width: 8),
const CircularProgressIndicator(),
]
],
);
},
);
}
}